
By Jeffrey Carl
From MacAddict Magazine, March 1999
You’ve heard the hype about Linux – a free version of the powerful Unix operating system. You’ve heard it makes a great web server or file server; or you’ve heard that it makes a fast workstation. You’ve envisioned yourself being the envy of your friends with an un-crashable OS, doing cool (yet vaguely dirty)-sounding things like “tweaking your kernel.” And, being an unrepentant geek, you can’t wait to play around with it. So you’re ready to think different – really different – and try installing it.
First, the good news – despite what you’ve heard, Linux installation can be a very simple, non-intimidating process. Even better, Linux has become available for most Macintoshes – both PowerPC and 68k. With any luck, you could be up and running in about an hour.
Now, the bad news – Linux support isn’t perfect for all Mac-compatible machines and peripherals. Most importantly, you’re taking off the training wheels here – installing an operating system on your machine which isn’t officially supported, doesn’t come with much documentation, and can require you to mess around with the very guts of your machine in ways you had never imagined were possible.
If you’re still with us after reading that last paragraph, then you’re stout of heart and soul – or you’re a glutton for punishment. Either way, let’s get started. For this example, we’ll be installing LinuxPPC 4 from a CD onto a Power Macintosh G3/266, with an external SCSI 1.5 GB hard drive set up as the Linux volume.
1. Get Prepared
1. First, make sure that you have a supported Macintosh for your Linux of choice (see sidebar) and a hard drive you can repartition to make a home for Linux. At least 400 MB of space is required, and 1.2 GB or more is recommended. You can use your MacOS drive to include Linux volumes, but you’ll have to wipe it clean and repartition it first.
2. Back up all of your files. Really. You can get away without doing this if you’re installing Linux onto a fresh new disk (and you like living on the edge); but if you’re repartitioning your current MacOS drive, you’ll need to do this because you’ll be wiping your disk clean in the process.
2. Partition Your Disk
You’ll need to create several disk partitions for Linux (at least two, and four or five is recommended). This comes from an old Unix tradition of placing files which seldom change (and important system files) on different partitions from frequently-changing user files so that they’re less likely to be corrupted by frequent writes to the hard disk. The minimum number of partitions is two: one for swap (sort of Linux’s virtual memory scratch disk) and one for /(“root,” or your regular filesystem). It is recommended that you create these two partitions, as well as one for /usr (where most of Unix’s programs are installed) and /home (where users’ personal files are stored).
1. Choose a drive-partitioning utility. Your choice here depends on what type of disk you’re going to use (SCSI or IDE/ATA). If you aren’t sure what type of disk you have, consult the documentation that came with your Mac.
For SCSI disks, you can use the Apple_HD_SC_Setup program which came with your Mac to create the partitions and set them as the correct type (A/UX). If you have a non-Apple disk or a Mac clone, you can use the third-party utility that came with the drive or computer (like FWB Hard Disk ToolKit) for this. If you have an Apple IDE or SCSI drive, you’ll need to use the Apple Drive Setup utility that came with your Macintosh (make sure you have the newest version). If you use Drive Setup (as we’ll be doing here), you’ll also need the pdisk utility (included on the CD) to convert the HFS partitions you create to their proper type.
2. Open Drive Setup utility and choose the disk you’ll be partitioning. Note that you can’t use Drive Setup from your startup disk; you’ll have to partition another drive, or boot from your MacOS system CD.
3. Get the Tools
First, you’ll need to get Linux and the utilities for installing it.
1. One of the nice things about “free operating systems” is that they’re just that – free. If you have a fast Internet connection, you can do an installation via FTP from the LinuxPPC site (ftp://ftp.linuxppc.org) or one of its mirrors, and it’s absolutely free. However, it may be easier for most users to order a CD from the good folks at LinuxPPC (http://www.linuxppc.org), which includes a recent distribution plus other programs and goodies for $XX plus shipping. In addition, if you buy a CD, you’re completely free to share it with as many people as you like.
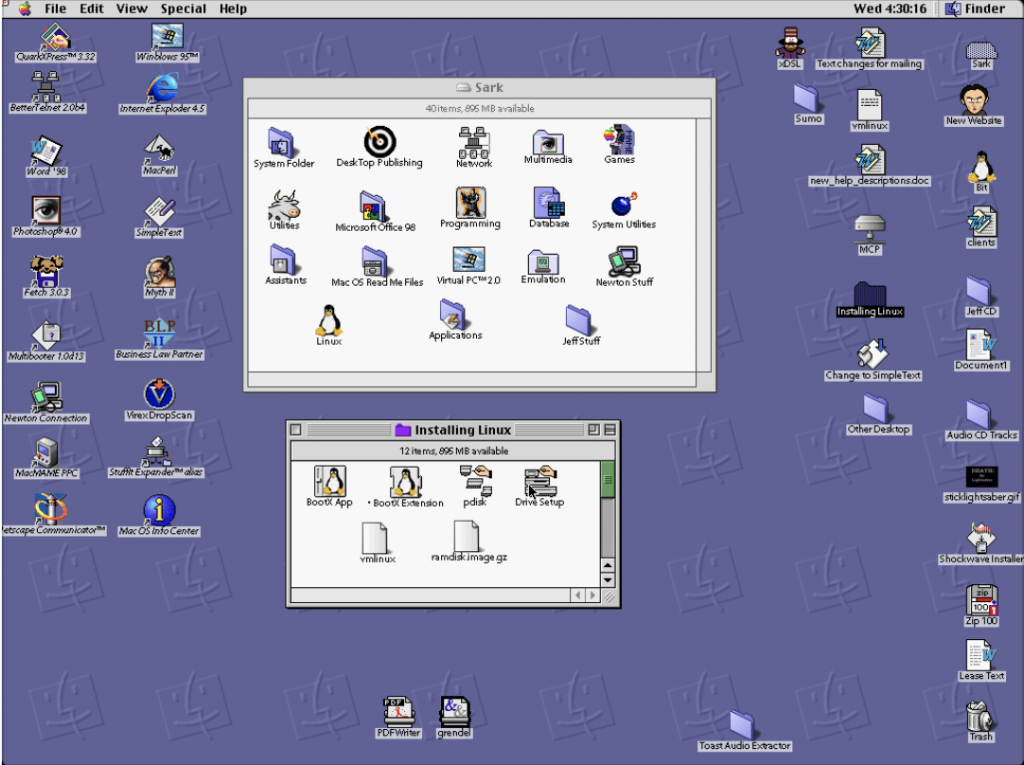
2. Install BootX (included on your LinuxPPC CD), the utility for switching back and forth from MacOS to Linux when you boot your computer. Simply drag the BootX control panel onto your system folder to install it (you’ll need to reboot before you can use it).
If this doesn’t work for you, you can manipulate which OS you boot into through BootVars (http://url.goes.here, or included on the CD), a control panel which allows you to manipulate your Mac’s Open Firmware. However, this isn’t recommended – mucking around with Open Firmware has reduced more than one formerly confident Mac Jedi to bingeing on non-prescription cold medications in frustration (also, this option is no longer officially supported by LinuxPPC).
3. Drag two files from the CD onto your System Folder: vmlinux and ramdisk.image.gz. These files should stay at the “top” level of your System Folder (not inside any folders inside the System Folder).
4. Begin the Installation
1. Insert the LinuxPPC CD into your CD-ROM drive, and open your BootX control panel (double-click it or select it from your Control Panels menu in the Apple Menu).
2. Leave the “root device” field blank. Check the “Use RAM Disk” and “No video driver” options.
3. Click the “Linux” button to reboot your computer into the Linux Red Hat Installer.
5. Use the Red Hat Installer
[Sidebar]
Resources
The LinuxPPC website:
The LinuxPPC Installation Guide:
http://www.linuxppc.org/userguide
The MkLinux website:
The Linux Mac68k Project website:
The Linux on PowerPC newsgroup: comp.os.linux.powerpc
[Sidebar]
Which Macs Can I Get a Linux For?
LinuxPPC 5.0 supports:
Any PCI-based Power Mac, PowerBook or Macintosh clone (including iMac), as well as BeBoxes. “Blue-and-white G3” not supported yet.
MkLinux 3.0 supports:
NuBus-Based Power Macs (6100, 7100, 8100, 9100), PCI Power Macs (7200, 7500, 7600, 8500, 9500, 7300, 8600, 9600), PCI Performas (4400, 5400, 5500, 6400, 6500), 20th Aniversary Mac, Desktop and Minitower Power Mac G3 (but not “blue-and-white G3” yet), PowerBooks (5300, 1400, 2400, 3400, G3, G3 Series)
LinuxMac68k supports:
Most 68030- and 68040-based Macs (but not most 68LC040-based). 68020-based Macs with a FPU (Mac II, or those with a FPU emulator).
For complete, up-to-date lists, please refer to the website of your Linux of choice.